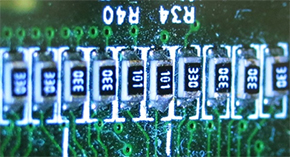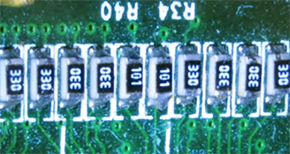
Depth of focus/depth of focus field

Popular focused on a general lens is one point.

(Except for special lenses for precision measurement like telecentric lenses.)

There is a region with less focus blur before and after the point where perfect focus is on.

This is called depth of focus.

When it deviates from a point where it is completely in focus, it gradually blurs. Where is the practical range will be the subjectivity of the individual. By narrowing down the optical path, you can gradually reduce this degree of blurring. However, by narrowing, the image becomes dark, so you can not use it with a lens with a high magnification.
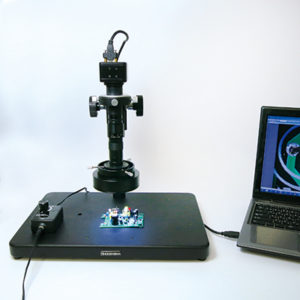
 

絞り付マイクロスコープ

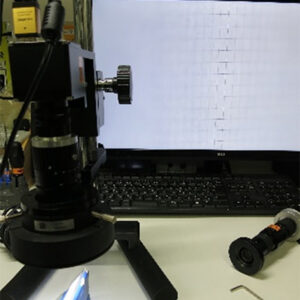
The left picture is our company’s USB microscope

USB microscope with aris
MS200PC3(20x~110x)


Compare the images when opened and narrowed with this irised microscope.

(When you narrow down the aperture, the depth of focus becomes deeper.)

<at 50x>
●Glass scale
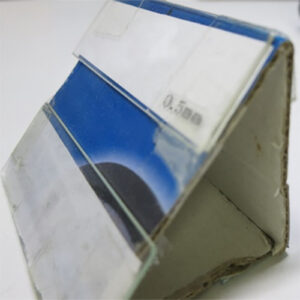
Tilt the 0.5 mm pitch glass scale to 45 degrees and observe straight from the top

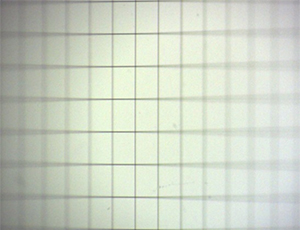
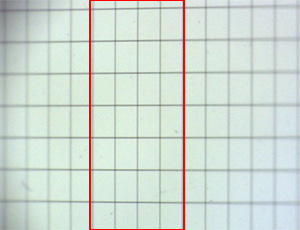
<Open the aperture>  <Close maximum aperture>
0.5mmピッチのガラススケールを観察 0.5mmピッチのガラススケールを観察

Since it is tilted to 45 degrees, it will be the depth of focus if multiplied by 1 / 1.41.

The focus on individuals depends on individual opinions.

If it is judged that 4 pitches (= 2 mm) are matched, 2 mm × (1 / 1.41) = 1.42 mm can be said as the depth of focus.

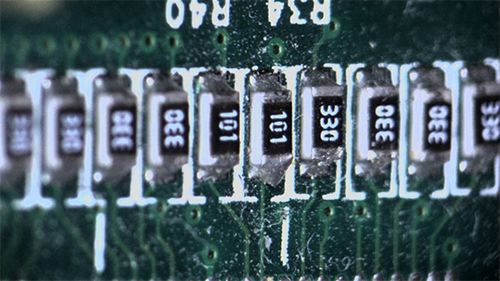
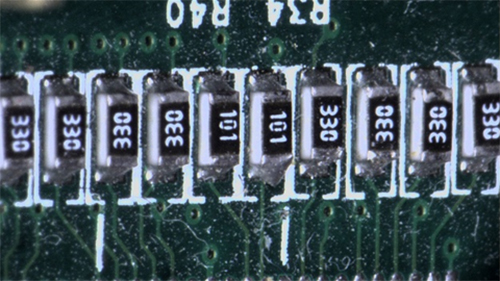
●For board

Tilt the substrate at 45 degrees and observe it 50 times.

(1.6 mm × 0.8 mm electronic components are lined at 1 mm pitch.)


<Open the aperture>  <Close maximum aperture>
絞りを開放にした時 最大に絞った時

<at 100x>
●Glass scale

I also checked the times at 100 times for your reference.

Since the magnification is high, the glass scale has been changed to 0.2 mm pitch

<Open the aperture>  <Close maximum aperture>
絞りを開放にした時 最大に絞った時


if this range is judged as a practical range, focus range is 1.2 mm × (1 / 1.41) = 0.85 mm

Please note that narrowing the aperture will make the lens darker and the resolution will also decrease.

(For details, please refer to “NA (Numerical Aperture)”.)


3.Depth of focus/techniques to increase depth of field


◆Explanation: About lens depth of focus/depth of field


Before introducing the trick, I would like to explain the depth of focus of the lens.


Depth of focus is also expressed as DOF ​​(Depth of Focuse).


In air (N=1)

DOF=(0.55/(2×NA²))+(1/M×K/NA)

(Explanation of formula)

The first item is “Item determined by resolution.”
The second item “K” is a “constant determined by the resolution of the observer’s eyes” and varies from person to person.
“M” is the “total magnification of the lens.”


What can be said from this is that in order to deepen the depth of focus,

The only way to do this is to lower the magnification or lower the NA.

At the same magnification, the only option is to lower the NA.


The specifications below are from the same manufacturer and series.

The one on the left is a megapixel compatible lens, and the one on the right is a general-purpose lens with low resolution.
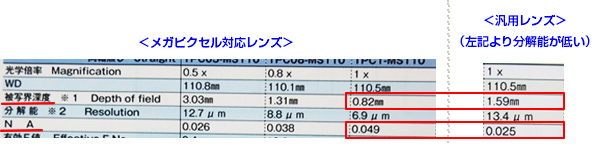
被写界深度比較

When comparing lenses with the same magnification and focal length, general-purpose lenses have a deeper depth of focus.

The only way to lower the NA with the same lens is to narrow down the aperture.


When using different lenses, if the magnification is the same, the longer focal length is better.

The NA decreases and the depth of focus increases.


◆Introducing tricks: “Aperture” and “Digital zoom”


If it is up to about 50x, you can use “aperture” and “digital zoom” together.

Even a simple microscope made with a fixed focus lens

Achieves deep depth of focus/depth of field.

However, both “aperture” and “digital zoom” tend to reduce resolution.

Use a 4K (8 million pixel) camera and a corresponding high-resolution lens.

It is recommended.


A 4K camera (8 million pixels) with a 50mm lens compatible with 10 million pixels,

I added a close-up ring so that I could take macro shots at 50x magnification and took some comparison shots.
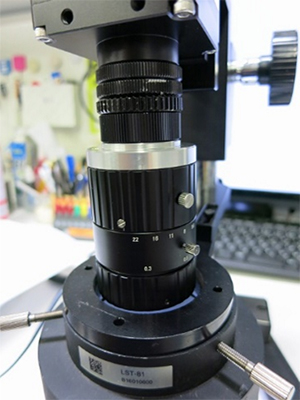


固定焦点レンズで作ったマイクロスコープ


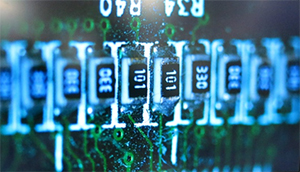
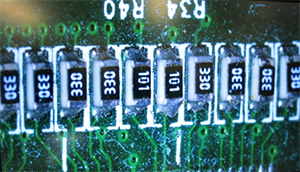
Photographed the same board as above under the same conditions.


(1)At 50x, depth of focus/depth of field can be adjusted just by changing the lens aperture

<When opening the aperture> <When fully opened>
絞りを開放にした時 絞りを最大に絞った時


(2)After adjusting to achieve 50x magnification with a digital 2x zoom, fine-tuning the aperture of the lens to adjust the depth of field.

<When opening the aperture> <When fully opened>
絞りを開放にした時 絞りを最大に絞った時


(3)The benefits of using this trick:


– Since fixed-focus lenses are used, zooming is not possible.
– However, unlike macro zoom lenses, the working distance is not fixed.
– This flexibility allows for longer working distances (W.D.), system miniaturization, and adjustment of depth of field.
– Depending on the lens selection, you can achieve any fixed magnification ranging from 5x to 50x.”


4.Summary


The depth of field, also known as the zone of acceptable focus, refers to the area with minimal focus blur around a perfectly focused point.

The practical range of depth of field is subjective and varies from person to person.

However, by combining “aperture adjustment” and “digital zoom,” you can achieve a deep depth of field with a simple microscope made using fixed-focus lenses, up to around several times magnification.”
ĐỘ SÂU TRƯỜNG ẢNH/ VÙNG LẤY NÉT LÀ GÌ

Trong ống kính phổ biến thì điểm lấy nét hoàn chỉnh là 1 điểm.
( ngoại trừ ống kính đặc biệt như ống kính viễn tâm)
Ở phía trước và sau điểm lấy nét hoàn chỉnh có vùng hơi bị nhòe.
Cái này gọi là vùng lấy nét.
Càng cách xa điểm lấy nét hoàn chỉnh thì càng bị nhòe.  Phạm vi sử dụng đến đâu sẽ thành ý chủ quan của cá nhân. Khi khép trường truyền ánh sáng thì có thể giảm dần độ nhòe này. Tuy nhiên khi trường truyền ánh sáng bị thu hẹp thì hình ảnh sẽ trở nên tối nên không thể dùng ống kính với độ phóng đại cao.


絞り付マイクロスコープ

Hình bên trái là Microscope USB có gắn khẩu độ của công ty chúng tôi

USB microscope with aris
MS200PC3(20x~110x)


So sánh hình ảnh khi mở và thu hẹp khẩu độ với Microscope có gắn khẩu độ.
( khi thu hẹp khẩu độ thì vùng lấy nét sẽ sâu hơn)


<ở 50 lần>
● Thước kính
Nghiêng thước kính có bước 0.5mm  45 độ và quan sát thẳng từ phía trên.

<khi mở khẩu độ>  <khi đóng khẩu độ tối đa>
0.5mmピッチのガラススケールを観察 0.5mmピッチのガラススケールを観察

Vì nghiêng 45 độ nên nhân 1/1.41 sẽ thành vùng lấy nét.

Đến chỗ nào thì nét là ý chủ quan của cá nhân.
Nếu ước chừng 4 bước(=2mm)là thích hợp thì có thể nói vùng lấy nét là 2mm×(1/1.41)=1.42mm.


●Trường hợp bảng mạch
Quan sát thử bảng mạch nghiêng 45 độ ở mức 50 lần.

(linh kiện điện tử 1.6mmX0.8mm được xếp với khoảng cách 1mm)

<khi mở khẩu độ>  <khi đóng khẩu độ tối đa>
絞りを開放にした時 最大に絞った時

<ở 100 lần>
●Thước kính
Để tham khảo thì cũng kiểm tra ở mức 100 lần.
Vì độ phóng đại được tăng cao nên đổi sang thước kính có bước 0.2mm.

<khi mở khẩu độ>  <khi đóng khẩu độ tối đa>
絞りを開放にした時 最大に絞った時

Nếu ước chừng phạm vi này là phạm vi sử dụng thì vùng lấy nét là 1.2mm×(1/1.41)=0.85mm

Khi đóng khẩu độ thì xin lưu ý rằng có khi ống kính sẽ tối hay là độ phân giải cũng sẽ giảm.
(Vui lòng tham khảo「NA(khẩu độ số)」)


3.Cách tăng độ sâu tiêu điểm / độ sâu lĩnh vực chụp ảnh


◆Giải thích: Về độ sâu tiêu điểm / độ sâu lĩnh vực chụp ảnh

Trước khi giới thiệu các mẹo và thủ thuật, chúng ta sẽ giải thích về độ sâu tiêu điểm của ống kính.

Độ sâu tiêu điểm cũng được biểu diễn dưới dạng DOF (Depth of Focus).


Trong trường hợp trong không khí (N = 1):

DOF = (0.55 / (2 × NA²)) + (1 / M × K / NA)

Cụ thể:

1. Khoản đầu tiên là “mục được xác định từ độ phân giải”.
2. “K” trong khoản thứ hai là một hằng số được xác định từ khả năng phân giải của mắt của người quan sát và có thể thay đổi giữa các cá nhân.
“M” là “tổng tỉ lệ phóng đại của ống kính”.


Có thể nói là để làm cho độ sâu tiêu điểm sâu hơn, bạn có thể giảm tỉ lệ phóng đại hoặc giảm NA.

Nếu giữ tỉ lệ phóng đại không đổi, thì chỉ còn cách là giảm NA.

Dưới đây là thông số kỹ thuật của hai loại ống kính cùng một nhà sản xuất, cùng một dòng sản phẩm, với ống kính hỗ trợ độ phân giải cao ở bên trái và ống kính thông thường với độ phân giải thấp ở bên phải.

被写界深度比較

Cùng tỉ lệ phóng đại và cùng một khoảng cách tiêu điểm, độ sâu tiêu điểm của ống kính thông thường sẽ sâu hơn.

Để giảm NA trên cùng một ống kính, cách duy nhất là thu hẹp khẩu độ.

Khi so sánh giữa các ống kính khác nhau với cùng một tỉ lệ phóng đại, thì ống kính có khoảng cách tiêu điểm lớn hơn sẽ có NA thấp hơn, dẫn đến độ sâu tiêu điểm sâu hơn.


◆Cách thủ thuật giới thiệu: “Thủ thuật về khẩu độ” và “Zoom kỹ thuật số”


50 lần cũng là một con số đủ lớn để kết hợp “khẩu độ” và “Zoom kỹ thuật số” trên một ống kính cố định, thậm chí trên một ống kính microscope đơn giản, để đạt được độ sâu tiêu điểm và độ sâu lĩnh vực ấn tượng.

Tuy nhiên, cả “khẩu độ” và “Zoom kỹ thuật số” đều làm giảm độ phân giải, vì vậy tôi khuyên bạn nên sử dụng một máy ảnh 4K (8 triệu pixel) và ống kính cao độ phân giải phù hợp.

Tôi đã thực hiện một thử nghiệm so sánh bằng cách lắp một ống kính 50mm hỗ trợ 10 triệu pixel lên một máy ảnh 4K, và so sánh chụp ảnh với một vòng macro cho phép chụp ảnh với tỉ lệ phóng đại 50 lần.


固定焦点レンズで作ったマイクロスコープ


Cùng một bảng mạch được chụp dưới cùng điều kiện như trên.


(1) Ở tỉ lệ phóng đại 50 lần, chỉ điều chỉnh khẩu độ của ống kính để điều chỉnh độ sâu tiêu điểm và độ sâu lĩnh vực.

Khi mở khẩu độ rộng nhất: Khi thu hẹp khẩu độ tối đa:
絞りを開放にした時 絞りを最大に絞った時


(2) Sau khi điều chỉnh để đạt được tỉ lệ phóng đại 50 lần với kỹ thuật Zoom kỹ thuật số gấp đôi:

Điều chỉnh độ sâu tiêu điểm và độ sâu lĩnh vực bằng cách điều chỉnh khẩu độ của ống kính.

Khi mở khẩu độ rộng nhất: Khi thu hẹp khẩu độ tối đa:
絞りを開放にした時 絞りを最大に絞った時


Lợi ích khi sử dụng thủ thuật

Sử dụng ống kính cố định, bạn không thể điều chỉnh được khả năng phóng đại nhưng có thể thay đổi các yếu tố khác như khoảng cách làm việc (W.D.), kích thước hệ thống, và độ sâu lĩnh vực theo ý muốn, tương tự như ống kính macro.

Tùy thuộc vào lựa chọn của bạn về ống kính, bạn có thể chọn bất kỳ tỷ lệ phóng đại cố định nào từ 5 lần đến 50 lần. Điều này cung cấp một phạm vi linh hoạt cho việc chụp ảnh macro với các yếu tố tùy chỉnh.

。


4.Tổng kết 


Độ sâu lĩnh vực là khu vực ít mờ với một điểm hoàn toàn nét trước và sau đó. Cụ thể, điều này thường được xem xét là thực tế trong phạm vi cá nhân.

Đến mức độ phóng đại khoảng 50 lần, việc kết hợp “khẩu độ” và “Zoom kỹ thuật số” trên ống kính cố định có thể giúp bạn đạt được độ sâu tiêu điểm và độ sâu lĩnh vực ấn tượng khi sử dụng một loại “microscope” được tạo ra từ ống kính cố định.