How to save video with Raw 8/16 USB camera

Some DirectShow-compatible USB cameras also have several video formats such as: YUY 2, RGB 24, RAW 8 etc.


Basically, if you use DirectShow compatible USB camera, you can use it even if application software changes.


However, it may not be usable because the video format is not supported by this application software.


Our cameras will be the video format of RGB 24 if the model number begins with “GR”, and the video format of RAW 8 starting with “DN”.


Free viewer software seems to be relatively compatible with RGB 24.


I have a question that how to record video with a USB camera.

There are some products that match to RGB 24 including free software. Please take a look.

However, there is small products that match to RAW8. We can divide into 2 types as follows:


1. Amcap
It is a sample software of DirectShow SDK. It is software for device testing and copyrighted by Microsoft Corporation.
There are sites that arrange and sell but basically it is free software.
It is only recording with AVI (uncompressed) file. Because it is uncompressed, the size of the saved file becomes large.


2. CCI-Pro-MRIt is free software. Up to 4 cameras can be controlled simultaneously.

Here you can take pictures and record videos.

However, the number of cameras that can shoot at the same time, the resolution depends on the performance of the PC and is not guaranteed.

* Please refer to the precautions when using multiple USB cameras with one PC.


3. intelliviewer (Three Imaging Inc.)

It is paid software. It is software which can guarantee operation with our camera.

It is multifunctional software with measuring function and tiling function.

Only AVI (uncompressed) files are recorded.

Although it is expensive software (price 98,000 yen), I think whether it should be used other than the recording function.

Maximum number of images that can be saved by external trigger

It changes greatly with the frame rate of USB camera.


If the Viewer software attached to our DN series, the measured value of the frame rate will be displayed in the lower row. (It is actually measured value, not theoretical value.)

フレームレート

In the above example, the actual frame rate is 41.94 frame / sec.


The maximum number of sheets can be taken is 90% of this value.


It becomes 41.94 × 0.9 = 37.7. In this case, you can save up to 37 images / sec.


However, the following two conditions are necessary.

· There is no count up of the above bad frame (blue circle part).

· The delay time is 0 ms

外部トリガ

If fps increases, you can save more.


· Decrease resolution

· Increase the number of clocks (no bad frame occurs)

· Change USB2 to USB3


Voltage specification of external trigger

· The input voltage is 3.3 V to 24 V. In case

· Set the input pulse width to 5.1 μsec or more.

· The delay from the input of an external trigger to the start of exposure is several μsec.

How to display the image on the PictureBox instead of another tab (using the attached SDK)

How to display the image on the PictureBox instead of another tab (using the attached SDK)?


If you use the sample program of SDK, the image will be shown in a separate window.


If you want to display in PictureBox inside Form,

Please refer to API manual page.

int iCube SDK_Start (int nCamIndex, HWND ImgHandle, bool Preview, bool Callback)

With the function above, an image is displayed on the PictureBox by using the handle of PictureBox for HWND ImgHandle.


Example:
DDX_Control(pDX, IDC_PIC, m_pic);
nStat=ICubeSDK_Start(g_iCurrentCam,m_pic,true,true);

Display the image according to the size of PictureBox:

Example:
DISP_PROPERTY disp_prop;
ICubeSDK_SetDisplayMode(nCamIndex,DISPLAY_FIT_TO_WINDOW, disp_prop);

Linux compatibility of USB camera DN 2 / DN 3 series

There is Linux folder in the CD of our USB camera (DN 2 / DN 3 series).

There are also drivers for Linux


In this case of Linux, this driver does not always support all.

(Sometimes it does not work.)


There are two suppoting methods as following:


1. Let’s the customer try this driver software.

(Please use free demonstration equipment.)


2. Please inform us your Linux environment. In this case, it is necessary to provide following information:

(1) Kernel (Kernel) version

(2) Distribution version (Fedora 14, Ubuntsu 14, etc.)

(3) CPU (Core-i, Atom, ARM-processor, etc.)


(Note) It does not match to UVC which recognizes the camera immediately under Windows or sV4L (Video for Linux) under the Linux environment.


Image format

Our camera is DirectShow compatible camera.

By installing a driver to your PC, the images will be displayed with

 Viewer software that runs on windows.


(1) Of course, it works with Viewer software attached to the camera.

映像フォーマット

 (2) It works even with the application attached to another camera.

映像フォーマット

Basically, you can see if running with AMCAP whether DirectShow-compatible camera.

This is Viewer software distributed free by Microsoft for engineers. (If you can install with AMCAP, DirectShow compatible camera is suitable too)

映像フォーマット

(3) Our camera also shows the images with AMCAP.

映像フォーマット

However, it may not be reflected in the setting on the application software.

In that case, you need to modify the application program. (It is necessary to pay attention for dedicate software)

(4) You can recognize our camera through these application software. But, the image does not show.

映像フォーマット

The biggest reason is to make video format diffrences.


There are several types of video formats.

YUY 2, RGB 24, RAW 8 … When making applications in order to match with various cameras, we will produce it so that it can deal with general video formats.

Since the above software does not support to RAW 8, our camera does not show. (Our video format of the USB camera DN series is RAW 8.)


For DirectShow-compatible cameras, if you modify video formats clearly, it seems to work in many cases.

What’s Directshow compatible camera?

DirectShow is a collection of instructions, functions and conventions that can be used for conversion libraries and programs of videos provided by Microsoft.

In a very brief explanation, it means directshow compatible camera can operate with a common command (programmed).


If PC recognizes USB camera, the application software can operate without using the one attached to the camera.

(It may be necessary to separately require the PC to recognize the camera.)


In other words, you can use application software from another company. (Due to common instructions (programmed).)

You can obtain and use necessary software according to the application such as: Viewer software, measures images software, automatic visual inspection software, 3D synthesis software, and so on.

There are various companies that actually sell only software.


However, there are several types of shadow image format output from the camera and it is necessary for the application software to support this video format.

Video formats include YUY 2, RGB 24, RAW 16, etc.

Those sold only by software cover a typical video format but some of these items attached to the camera correspond only to the video format of that camera.

What’s advantages and disadvantages of USB Microscope?

USB Microscope is a microscope that connects to a personal computer using USB cable and display the resolution on the screen.

The advantage is that you can observe with a personal computer and save images easily. In addition, it is possible to do various functions such as measurement, focus synthesis, binarization, etc. Since USB microscope use Directshow compatible camera. Thus, other company’s Directshow compatible software can be used.

The disadvantage is that the display speed will be slowed in proportion to the resolution since it depends on USB communication speed. It is possible to record a video. However, frames may be dropped.

We have various USB microscopes available.


200万画素USBマイクロスコープ 3.0 mega USB Microscope(CMOS)
TG300PC2
CCD140万画素USBマイクロスコープ CCD 1.4 mega USB Microscope
TG140CCD
CCD140万画素USBマイクロスコープ USB3.0 microscope(CMOS)
TGR350PC


* We also offer high magnification and low magnification microscopes. You can choose the resolution of the camera. So, please contact our technical support for details.

What’s USB3 Vision ?

Difference between USB 3.0 and USB 2.0

・10 times transfer rate: 350 MB / s

・Upward compatible with USB 2.0

・Maximum cable length 3 m

The basic parts are shown.


USB3 Vision was produced as “camera interface standard using USB 3.0” that can be used safely for agriculture, industrial and machine vision.

(There was no standard camera interface for USB 2.0.)


The advantage points of machine vision are:

・Stability

・High-speed data transfer

・Reliable data transfer

・Stable recovery from communication error condition

Robustness (vs. Connector)

・Reliable mating

・Secure fixing to the housing

We aimed to be built.


There is a function to resend a packet when a communication error (packet dropped) occurs.

→ This will almost eliminate screen freezing that occurred with USB 2.0.


The image was saved as “camera → memory via CPU → camera → memory”.

→ You can reduce the CPU load.

(“direct memory access”, “zero copy mechanism”, “DMA”, etc. are made by other manufacturers)


In addition, the screw lock function is also adopted as the connector.

Stability and speed are equal or higher than GigE camera.

In addition, the price will be cheaper than the GigE camera.


There was also a disadvantage that maximum cable length was 3 m, but recently cable for machine vision using optical fiber has been on sale and can be used with more than 10 m.


USB3 Vision logo is attached to the camera conforming to this standard.

USB3Vision

How to use C-mount as CS-mount

Screw diameter is exactly the same for C mount and CS mount.

It only differs from the back flange (the distance from the end of the lens to the image sensor).

CS mount is shorter by 5 mm.

Depending on the camera, 5 mm thick ring (C mount ring) may be attached to the tip to make C mount.

Therefore, if you remove C mount ring, it becomes CS mount.

Cマウント
This is image of C mount.

Cマウント

remove the c mount ring.
CSマウント


it will be cs mount.

What’s C-Mount and CS-Mount?

C mount is a screw mount that fixes the camera and lens by screws.

Inner diameter 25.4 mm (1 inch), screw pitch 0.794 mm, flange back 17.526 mm is C mount standard

With the miniaturization camera, there is also a CS mount that reduces C flange back by 5 mm.

(The caliber and screw pitch are the same.)

Cマウント CSマウント


Depending on the camera, 5 mm thick rings may be installed to both C mount and CS mount, so that It’s necessary they can be removed.


Cマウント CSマウント Cマウント CSマウント

Summary 


Both C mount and CS mount can be mounted with the same aperture and screw pitch.

However, please take a note that the performance of the lens can not be fully demonstrated.

(The symptoms such as ” out of focus”, “the focal length fluctuates even though it is a zoom lens (* 1)”, “the magnification changes”, etc.)

(* 1) Please refer to “Macro lens and macro zoom lens”.

What’s the difference between CMOS and CCD?

CMOS and CCD generally have the following differences.

However, CMOS function has improved recently, there is no clear difference.


<CCD is …>

  1. CCD gives more natural color representation.
  2. Shadow image clear
  3. High price.
  4. High power consumption.
    → It is difficult to achieve high resolution with battery operated digital cameras, video cameras, etc.
    (It does not much matter with USB camera for FA)
  1. Partial readout of the image sensor can not be performed.
    → It is impossible to increase the display speed by lowering the resolution.(Therefore, there is no resolution changes in our CCD camera GR140CCD.)


<CMOS is …>

  1. A little bit of blurring appears in the image and the clarity drops.
  2. Cheap price
  3. Partial readout of image sensor can be performed.
    If you reduce the resolution with CMOS camera, you can raise the display speed.
  1. Vulnerable to movement
    Distortion (deformation) and afterimage will occur. It is a weak point of CMOS such as “dropping frames” or “awkward movement”.
    (It can be said to the rolling shutter type sensor in general.)


CCD(Global shutter) CMOS(Rolling shutter)
グローバルシャッター ローリングシャッター


Recently, the CMOS feature of the camera used in the industry has been enhanced.

In the past,

CMOS → rolling shutter → weak motion

CCD → global shutter → strong motion

The figure was completed.

Recently, there is a type of global shutter in CMOS to replace CCD.

Power consumption

Electricity is denoted by [VA] and [W]


Calculation for direct current:

Electricity (W) = voltage (V) × current (A)

Alternating current will change periodically not fix as direct current

Not all the product of voltage and current are consumed by the load.


For direct current, the power consumed purely by the load is called active power.

Active power (W) = Actual value of voltage (V) × Actual value of current (A) × Power factor (cos θ)

There is also power (reactive power) that does not actually work.

The power indication is called apparent power

Apparent power (VA) = actual value of voltage × actual value of current.

Long-time recording of high-speed camera 2

With standard software, you can not record for a long time.


The high-speed camera image has a large number of frames with very large capacity.

The high recording speed is also required

I think that I can not catch up unless I write directly to hard disk or SSD.

Since recording speed is also necessary, combining between high function PC and SSD is also required.

However, if you use about half of the capacity for SSD, the recording time will drop sharply. Therefore, it is very important what to choose.

In the case of long-time recording, you should to check not only software but also hard disks too.


At our company, we provide high function PC with built-in SSD, camera and recording software (custom order) as one set.

(Recording time also changes depending on the capacity of SSD, the speed of the high speed camera and resolution)


Combining high speed camera (CHU 130 EX), SSD built-in high function PC, long time recording software, the price is about 1.2 – 1.3 million yen.

Long-time recording of high-speed camera 1

Using buffer memory or not will much affect to long-term recording of high-speed cameras

Shodensha’s low price high speed camera has 2 GB memory for recording.


If you are using a high-speed camera without a buffer memory, the video captured by camera is written directly to RAM (memory) of the PC.

Tempoary video will be saved to HDD.


In conslution, the balance between HDD saving and PC memory is an important factor in whether long-time recording or not.


If the saving speed to HDD is slow, the memory will overflow.


・Equip as much memory as possible.

・It is necessary to equip SSD instead of HDD on PC.


It is necessary to evaluate with PC although there is a long-time recording software

In the case of purchasing a new PC, it is also possible to conduct experiments at our company.


Incidentally, if you record for 15 minutes with 1.3 million pixels (1280 x 1024), it will be a 120 GB file.

TILT FEATURES OF LENS

TILT is a method to adjust the depth of focus by tilting the optical axis of the lens.

It is possible to focus on the entire tilted object that does not parallel to the lens area.


The upper row connects to the lens as usual

The optical axis is tilted in the lower row. (The connecting part is handmade)

カメラ
   
Use these two types to look at the board.  
ティルトアオリ  
   
< Normal shooting> <Tilt shooting>
ティルトアオリ ティルトアオリ


How to fix the camera?

The mounting screws of most cameras are unified with tripod screws.

It usally called “Camera screw”, “tripod screw”

There are few differences between manufacturers and types of cameras.


The screw size is 1 / 4-20 UNC (1/4 inch coarse).

The screw diameter is about 6 mm.

There is no difference in single lens reflex cameras, small digital cameras, surveillance cameras, FA cameras..

The mounting screws shown in the bottom photo are all the same size.

1/4-20UNC


With a small camera or an old camera, it may be used 3 / 8-16 UNC (3/8-inch coarse) The screw diameter is about 9 mm.

You can prepare a screw for camera fixing, but fixtures are also sold in various ways for both civilian and industrial.

Since the angle can be changed. Thus, it is one more way to use existing products.


Since it is a standard screw for the camera, you can use commercially available camera (tripod, pan head etc).

Since various conversion screws of 1/4-inch ⇔ 3/8-inch are available, tripods can be used even if the screw diameters are different.


三脚等の固定具 三脚等の固定具


Examples of camera fixing devices

Below is a part of LPL’s catalog.

民生品のカメラ固定具

民生品のカメラ固定具

・Examples of industrial camera fixtures

The following is a part of the catalog of SFC Co., Ltd.         

産業用のカメラ固定具

If the lens is long and heavy, there are also lens mounts

(All our lenses for microscope are φ50 mm (fixed part)


レンズ側をホールド
レンズ側をホールド


Camera attach with borescope

In camera function, we have Dynamic Range.


Dynamic range is the numerical value that represents the signal reproduction capability and the ratio between the minimum value and the maximum value in dB (decibel).


A camera with high value of dB is less prone to halation even if the object is bright and dark areas are less likely to shade. (High reproduction ability against changes in brightness.)


When viewing the interior of a metal workpiece like a borescope with a single lighting, the difference between the direct light and the shadow is large. The camera with a large dynamic range is more suitable for observation.


Anti-radiation C mount camera

Normal C mount cameras can not be used for observation and monitoring in radiation areas such as nuclear facilities and laboratories.

In particular, it is necessary to use a sensor with radiation resistance performance for the imaging element.

Although it is not our product, it seems that the following radiation-resistant CMOS cameras are also on sale.


耐放射線Cマウントカメラ

UV (ultraviolet) observation

In order to perform UV observation (ultraviolet observation), it is necessary to have a UV (ultraviolet) sensitive camera and a UV compatible lens.


Shodensha cameras mainly observe visible light.

As picture shown below, there is no sensitivity in the ultraviolet region.

UV(紫外線)観察について


UV observation is divided into two types:

(1) Observe scratches, spots, irregularities on the surface of objects

(2) Observation of weak fluorescence phenomenon of objects

For cameras, you need to choose one of the following:

(1) A camera sensitive to ultraviolet rays. It is a camera like the one below.

紫外線に感度を持つカメラ


(2) A camera is not merely an ultraviolet range. But an ultrahigh sensitivity camera is necessary to catch a weak fluorescence phenomenon. In general, I use a cooled CCD camera. It becomes the camera as follows.

冷却CCDカメラ


冷却CCDカメラ

For lenses, it is necessary to use UV-compatible lenses as below.

(The following is the zoom lens of Navitar USA)


UV対応タイプのレンズ

Is the camera compatible with monochrome?

There are monochrome (black and white) mode and pure monochrome in camera (black and white camera).

Either case may be good when used for applications such as contrast emphasis of edge noodles of observation objects.

Monochrome mode of color camera originally expresses color image in black and white

What is the advantage of a pure monochrome camera?

Generally, monochrome camera  is more sensitive than color camera


Higher sensitivity works well for adjusting the shutter speed and depth of focus.

Besides that, wavelength sensitivity characteristics are different.

The sensitivity of the sensor itself may not change very much.


Example of spectral
characteristics
for color camera


カラーカメラの分光特性例

Example of spectral
characteristics for
monochrome camera

モノクロカメラの分光特性例


Example of filter characteristics for color camera


カラーカメラのフィルター特性例


However, color cameras often contain filters. Thus, most of color cameras has the wavelength cut at about 650 nm.

What happens to the actual field of view when changing the image size?

When you attach the lens with the same magnification, the number of inches in the image size is smaller, the magnification and the narrower the field of view will be smaller.


Please see the picture below.

I shot the picture with lens, monitor, and focal length under the same conditions.

1/2 inch camera
1/2.5 inch camera
1/3 inch camera


You can realize that the 1/3-inch camera has a narrower field of view than the 1/2-inch camera.

Besides that, when selecting lenses, you need to check the size of the camera’s corresponding image sensor.

Please note that vignetting will occur if you select a lens that is less than the camera’s compatible image sensor size.


A black part (vignetting) is present at the four corners of the screen

We will also select lenses and cameras that is suitable for your requirements. Please contact our technical advisor for more details.

What is camera image size?

The specifications of C mount camera always include “image size” and “image sensor size”.

In addition, this size is the value needed to calculate the field of view (when selecting the lens).

(To calculation of field of view, please refer to “f value of lens”.)


The use of “image sensor size”


You can also calculate the size of one pixel.

For example: The image sensor of 1 / 2.5 inch of 1.3 million pixels (1280 X 1024) is:

Horizontal  5.6 mm / 1280 pixels = 0.0044 mm / dot

Vertical    4.2 mm / 1024 pixels = 0.0041 mm / dot.


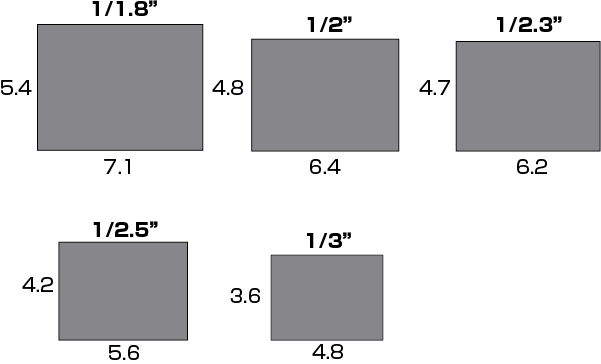
Image Sensor Size Meaning


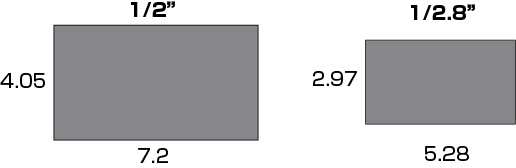
Typically, when referring to monitor sizes, it indicates the diagonal length. However, the size of an image sensor is not measured diagonally.

For instance, in the case of a previously mentioned 1/2.5-inch sensor with 1.3 megapixels, the horizontal dimension is 5.6mm and the vertical is 4.2mm, resulting in a diagonal length of approximately 7mm.


However, the actual 1/2.5-inch sensor measures 10.16mm diagonally. This discrepancy originates from the historical representation of imaging tubes using vacuum tubes, where the size indication was based on the diameter of these tubes. Consequently, the size representation of image sensors has been aligned with this convention.


The Actual image sensor size 


水平、垂直が 4:3の撮像素子


水平、垂直が 16:9の素子サイズ


The practical use of imaging sensor size

The actual utilization of imaging sensor size pertains to the selection of the requisite lens and the calculation of the distance to the subject.


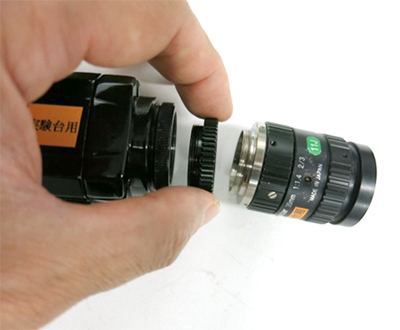
(1) In the case of CCTV lenses (fixed focal length lenses)


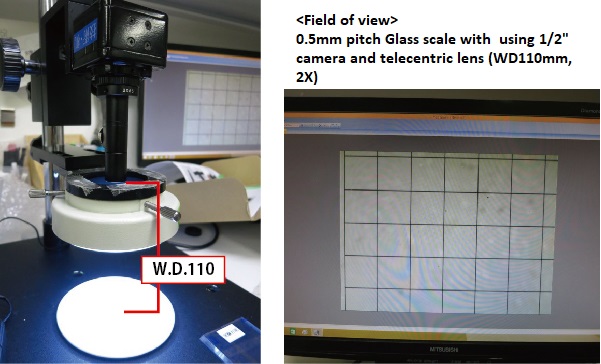
We shall calculate the required lens based on the desired dimensions of the subject to be captured. At this juncture, the essential factors are the “imaging sensor size of the camera” and the “distance to the subject (W.D.).”


CCCTVレンズ(固定焦点レンズ)の場合


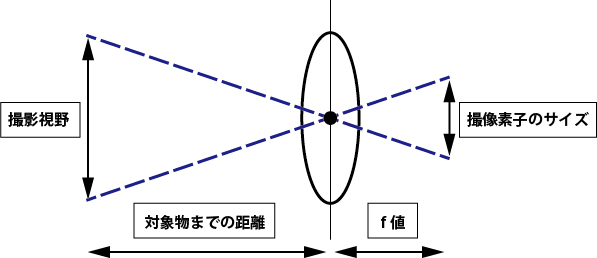
If we aim to ensure a vertical field of view of 300mm at a distance (W.D.) of 1 meter, what focal length lens should be selected? Assuming the use of a 1/2-inch camera sensor, the dimensions are as follows:

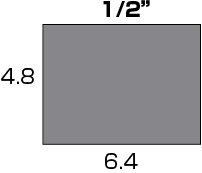
Imaging sensor size for a 1/2-inch camera:


1/2インチカメラの撮像素子サイズ


The formula for the f-value is as follows:

f-value = (Distance to the subject (mm) × Vertical size of the imaging sensor (mm)) / Vertical field of view

By substituting the values:

f-value = (1000mm × 4.8mm) / 300mm = 16mm

By selecting a lens with a focal length of 16mm, the desired vertical field of view can be achieved.

The calculation for the horizontal field of view can be done in a similar manner.

By the way, if either the vertical or horizontal field of view is known, the other can be easily calculated without additional computations.

For a square-shaped imaging sensor with a 4:3 aspect ratio, as in this case, the horizontal field of view would be 300mm × 4/3 = 400mm.


(2) In the case of macro lenses 

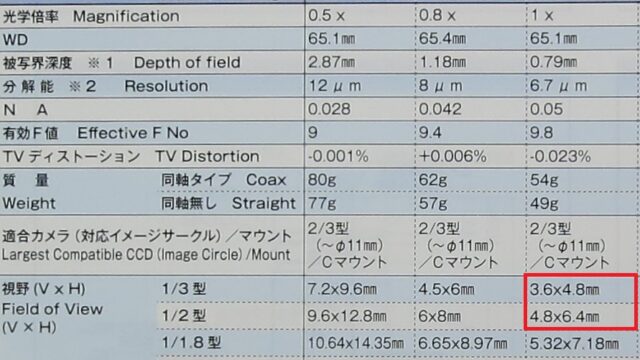
In the case of macro lenses used for capturing magnified images of subjects, the focal length is typically predetermined. In such instances, the f-value alone does not adequately represent the lens characteristics. Instead, the optical magnification is used as a measure.

For macro lenses, the optical magnification expresses the desired level of enlargement. With a lens at 1x (1:1 magnification), the observed field of view matches the size of the imaging sensor.

For example:
– For a 1/3-inch sensor, the dimensions are 4.8mm × 3.6mm.
– For a 1/2-inch sensor, the dimensions are 6.4mm × 4.8mm.

Considering these specifications, I recommend referring to our company’s macro lens specification sheet for more detailed information.


マクロレンズ


Additionally, when using a macro lens, the imaging sensor size is also utilized in calculating the overall magnification (the final magnification displayed on the monitor). The imaging sensor size plays a crucial role in determining the effective magnification of the captured image.


For more detailed information, I recommend referring to the concept of magnification in microscopes, as mentioned in the “Concept of Magnification in Microscopes” resource.


USB Camera CS series  USB Camera DN series  GigE Camera 
1/1.1 inch

CS1200-GC(12MP・color) /

CS1200-GB(12MP・monochrome)


EG1200-GC(12MP・monochrome)/

EG1200-GB(12MP・monochrome)

1/1.7 inch

CS1200-C(12MP・color) /

CS1200-B(12MP・monochrome)


EG1200-C(12MP・color) /

EG1200-B(12MP・monochrome)

1/1.8 inch  

DN3RG-130(1.3MP・color) /
DN3RG-130BU(1.3MP monochrome)


DN3RG-200(2MP color ) /
DN3RG-200BU

2MP – monochrome

EG320-C(3.2MP color) /

EG320-B(3.2MP monochrome)


EG600U-C(6MP color)/

EG600U-B(6MP monochrome)

1/2.3 inch   DN3R-1000(10MP color)  
1/2.5 inch CS500-C(5MP color) /
CS500-B(5MP monochrome )
DN3R-500(5MP color)  
1/2.9 inch

CS41-C(0,04MP・color) /

CS41-B(0,04MP・monochrome)


EG41-C(0,04MP・color) /

EG41-B(0,04MP・monochrome)

1/2 inch

CS130U-C(1,3MP・color) /

CS130U-B(1,3MP・monochrome)


CS500U-GC(5MP・color) /

CS500U-GB(5MP・monochrome)


EG130U-C(1,3MP・color) /

EG130-B(1,3MP・monochrome)

1 inch

CS2000-C(20MP・color) /

CS2000-B(20MP・monochrome)


EG2000-C(20MP・color) /

EG2000-B(20MP・monochrome)

2/3 inch    

EG501-C(5MP・color) /

EG500-B(5MP・monochrome)

Summary:

The imaging sensor size is a crucial value required for calculations such as “field of view” and “lens selection.” In the case of CCTV lenses, the f-value can be computed as follows to determine a lens that can achieve the desired vertical field of view:

f-value = (distance to the subject (mm) × vertical size of the imaging sensor (mm)) / vertical field of view.

For macro lenses, the imaging sensor size is utilized in calculating the overall magnification (the final magnification displayed on the monitor).


What is the flicker phenomenon?

The phenomenon of flickering” refers to irregularities observed in footage captured by a camera, such as “repeated variations in brightness” and “shifts in color tone,” which are not perceptible to the naked eye.

In this article, we will provide an overview of “flickering phenomenon” and discuss methods to prevent it.


(1) WHAT IS FLICKERING?


The phenomenon known as “flickering” occurs with certain lighting devices that either flicker in sync with the power frequency or pulse in a dimming system.

Although the human eye cannot perceive the flickering of light, when the camera’s shutter speed is faster than the frequency of the flicker, it results in irregularities in the captured footage, such as “repeated variations in brightness” and “shifts in color tone.” This is referred to as the flickering phenomenon.

Flickering occurs under lighting conditions that involve periodic flashes, such as fluorescent lights, while it does not occur with direct current lighting.

There are two types of symptoms associated with flickering phenomenon:

1. In cameras with a global shutter, the entire image experiences cyclic changes in brightness.
2. In cameras with a rolling shutter, the image exhibits horizontal stripes of brightness variations, and these stripes may appear to flow vertically.


The phenomenon of “flickering” in cameras with a rolling shutter results in the appearance of horizontal stripes of brightness variations. 


フリッカー現象


Methods to prevent the phenomenon of flickering can be categorized into three primary approaches:

1. Utilize lighting devices employing direct current illumination.
2. Adjust the shutter speed to a pace slower than the flicker frequency.
3. Employ a camera equipped with the “flicker-free feature.”


  1. Utilize lighting devices employing direct current illumination.

Flickering occurs in the presence of lighting sources that exhibit periodic emissions, while it does not occur when using lighting fixtures that operate on direct current illumination.

2. Adjust the shutter speed to a pace slower than the flicker frequency. 


The phenomenon of flickering can be somewhat mitigated by adjusting the exposure time or shutter speed settings of the camera, but it cannot be completely eliminated.

Even if it appears to have disappeared, there are still variations in brightness occurring at intervals of several tens of seconds or longer.

In particular, when capturing images with a high-speed camera under fluorescent lighting, significant flickering phenomena occur.

* If it is not possible to adjust the shutter speed on the camera, one can compensate for the reduced illumination by narrowing the aperture of the lens and using lighting fixtures with direct current illumination. This helps to comparatively reduce the impact of pulse lighting.


3. Employ a camera equipped with the “flicker-free feature.”


 The “flicker-free feature” enables the camera to automatically detect the flickering of the light source and capture images at optimal moments with minimal impact on brightness and color tones.

To avoid flickering phenomena, it is recommended to use lighting for high-speed cameras that either operate on direct current illumination or synchronize with the camera shutter, such as strobe lighting.

At our company, we offer a range of products including high-speed cameras, lighting specifically designed for high-speed cameras, and strobe lighting. If you are experiencing difficulties with flickering phenomena, please don’t hesitate to contact us for assistance.

What’s resolution?

Resolution means a numerical value indicating of pixels in a bitmap image. It is the fineness of the grid that expresses the image and it is represented how many pixels are divided in 1 inch.

For microscope, each camera, lens and monitor has different resolution.

1. Cameras and lens resolution are the detail of grid that represents the image.

It is a term that expresses the details of objects (screen, printed result, photographic film, etc.) that can define the size of the physical image.

Therefore, the physical resolution means the minimum unit that can be distinguished from the image (pixel, in the case of a printing result or photographic film, a line / space where the image can be resolved by a resolution chart) is determined per unit length of the object. It is expressed by the number that can be included and represents the definition level not the total number.

Camera and len resolution is very important in selecting resolution.

For example: If camera resolution is high and lens resolution is low, the image will be poor in resolution. Please be careful

  1. What is monitor resolution?

Have a look at this. “about monitor resolution

We will also select cameras and lenses. Please feel free to contact our Technical Advisor.

About LAN port connecting GigE camera

GigE camera is connected by LAN port.

However, there is no power supply line in LAN port attached to normal PC.

(Of course, power is necessary to operate the camera.)


There are two ways to use GigE camera.

1. Prepare individual separate power supply for camera.

2. Prepare NIC for PoE (Power over Ethernet) interface (LAN port with power supply line).

1.

There is no problem if an AC adapter is attached to the camera. But in order to connect between PC and camera, power support equipment is very necessary.

It is called PoE injector. It can be obtained easily around 10,000 yen.

It is possible to purchase with PC peripherals manufacturer (Elecom, Sanwa Supply, Buffalo etc.).

2.

NIC is short of Network interface card. NIC has the same meaning as the LAN board and indicates an expansion board. As mentioned above, there is no power supply line in the standard LAN port of a normal PC. Therefore, you need to add such an expansion board (card) to the PC.


What’s Dynamic Range?

When taking pictures by the camera, there are some cases which the part is too bright (halation / overexposed), and the part is too dark (blackened).

Dynamic range is called the range of contrast difference (defense range) which can be concealed at the same time to the edge before the halation (white jump) from black collapse (too dark to nothing). The unit is db (decibel).

The larger dynamic range number, the better camera.

However, when comparing human eyes and cameras, naked eyes are superior even with excellent cameras.

For example, even if you can see it with naked eyes, shooting with a camera may cause halation (white overexposure) or may not be visible.

What’s high dynamic range function?

It is a technique to express a wider dynamic range than normal image.

Reducing the contrast of the original image with large contrast and take a wide dynamic range.

Even with images with differences in brightness and darkness, it is possible to reduce blackout and whiteout.

The following is an excerpt from cameras specifications made by other companies, but WDR (wide dynamic range) has the same function.


There is what is called a dynamic range in the camera vocabulary. The dynamic range is the range of the brightest part and the dark part that the imaging element can feel.


If it exceeds this range on the bright side, it becomes halation (white jump).

The screen becomes black when exceeding this range in the dark.


HDR and WDR are functions that widen this range and reduce the difference between bright and dark areas. It is used for remove halation.

(However, if you use this function, the contrast will be lowered.)


For example: If you shoot a picture with differences in light and darkness, it will be like the picture below.


Normal function shooting HDR function shooting


Our HDTV camera has HDR function.

ハイダイナミックレンジ

By applying this, you can shoot images with reduced halation.

(It is an effect of widening the dynamic range. Although it does not make infinite, it can not be removed completely)


Normal function shooting HDR function shooting
   
Normal function shooting HDR function shooting


If this HDR function is combined with a filter and V character block, the performance will be further improved.

<HDR function + polarization filter>

<HDR function + White V character block (background)>

inch of Sensor element

The size of the imaging element written in the specification etc. is not the actual diagonal dimension in notation following the “tube diameter” of the imaging tube age.

For example, 1/2 inch CCD means 「A CCD with the same image size as the image size produced by a 1/2-inch imaging tube」

However, the size will be confirmed with this notation.

If it is a 4: 3 elements, the size will be identified as below.

“CCD Camera image size”
撮像素子のサイズ

CAN I BUY MICROSCOPE WITH MONITOR?

We have the “All in one Microscope” integrated between Android tablet with C-Mount Camera and Video Mircoscope with optional 8 inch monitor.

ビデオマイクロスコープ Microscope Video TG70TV
 +
8.0 inch monitor for video Microscope
GR-085TVA

It is possible to attach a small monitor to microscope pillar as belows:

モニタ用アングル モニタ用アングル

Besides that, there is another suitable option.

固定具  

Put it on monitor stage.

 
モニタ用アングル モニタ用アングル

By doing this you can angle the monitor.


モニタモニタモニタ 

DO YOU WANT TO USE MICROSCOPE WHEN YOU ARE ABROAD?

Our microscope adopts the AC adapter as power supply.

The AC adapter supports from 100 V to 240 V so you can use it overseas. (Some products are only 100V compatible)

However, please note that the shapes of plugs in each country are very different.


A型 <A type>

It is used in Japan and mainly in North America and Central America.

B型 <B type>
It is mainly used in North America and Central America. Even in Japan, it may be used in personal computers and OA equipment.
C型(SE型) <C type(SE type)>
It is used in parts of China and Europe.

※ There are also many other types of plugs. Transformer plugs are available at home electrical outlets.

About overseas supply voltage

  周波数 電圧
Japan 50/60Hz Single-phase 100/200V, Three-phase 200V
U.S.A. 60Hz Single-phase 115/230V, three-phase 230V
South Korea 60Hz Single-phase 110/220V, three-phase 200/220/380V
China 50Hz Single-phase 220V, three-phase 380V
Thailand 50Hz Single-phase 220V, three-phase 220/380V
Vietnam 50Hz Single-phase 220V, three-phase 380V

HOW TO SHOW CROSSLINE?

HD microscope Camera / PC monitor Direct with microscope camera has a standard cross line display function. You can turn on / off the cross line with the switch on the back.


For USB microscope camera, it is possible to display multiple cross lines by using optional Viewer software (MeasurePRO / MeasurePRO – Ex).


クロスライン
クロスライン

HD microscope /

PC monitor direct with microscope has standard cross line display function

(Both white line and black line can be displayed)

USB microscope optional

Software MeasurePRO /

MeasurePRO – Ex

Multiple cross lines can be displayed!


DO YOU WANT A CHEAP MICROSCOPE THAT YOU CAN TAKE ON A BUSINESS TRIP?

“For those in need of a somewhat advanced yet reasonably priced microscope, the DS-PC4 (USB microscope) and DS-70TV4 (video microscope) are available. While their zoom ratio is limited, and auxiliary lens attachment is not supported, they prove to be exceptionally cost-effective microscopes for individuals whose requirements align with their specifications.


In the case of the DS-70TV4, when paired with a commercially available video recorder equipped with a monitor, it becomes highly convenient for on-the-go observations, allowing you to observe from virtually anywhere.”


 Integrated LED USB Microscope DS-PC4

Intergrated LED

Video Microscope DS-70TV4

DO YOU WANT MICROSCOPE WITH THE CHEAPEST PRICE?

DS – PC (USB microscope) and DS – 70TV (Video microscope) are available for those who need a microscope which is full – scale yet inexpensive to some extent. The zoom ratio is small, auxiliary lens can not be used, but for those who apply to the conditions it is very affordable microscope.


低価格マイクロスコープ
低価格ビデオマイクロスコープ

Integrated LED Microscope

 USB 2MP DS-PC

 Intergrated LED

Microscope DS-70TV


In order to reduce the price of microscope, we can combine C-mount with CCTV lens and placing a connector in the middle.


Below is a 35mm M3514-MP CCTV lens in the C mount video camera GR-i700 and 5mm connector CR-5 in the middle

安価なマイクロスコープ

Below is how to fix the camera ising fixing tool.

(Since you can adjust the focus on the lens side, you do not need a stand like a microscope.)

安価なマイクロスコープ

Below is the observed picture of a coin yen.

Filed of view is 12mmx9mm at magnification 30 times.


Cマウントカメラと汎用のCCTVレンズを組み合わせ、その中間に接写リングを入れる方法があります

If the thickness of tconnector is increased, the magnification can be adjusted easily.

Even if it is not a dedicated lens with a certain magnification, it can be used as microscope.

Microscopes Ideal for Use on Inspection Lines

If you are using it on an inspection line, a High-Definition Microscope, Video Microscope, or Auto-Focus Microscope, all of which provide real-time display with no delays, would be suitable.

If you require high-resolution observation in full high definition, a High-Definition Microscope or an Auto-Focus Microscope is the optimal choice. If resolution is not a primary concern, a Video Microscope would be the most suitable option.

ハイビジョンマイクロスコープ

High-Definition Microscope

High-Definition Microscope

Advantages

– HD Microscope has smooth movement and high resolution as well as

– HD Microscope can be connected directly to Full HD Monitor through the HDMI port and industrial monitor as well.

Disadavantages

– HD Microscope can not use with a monitor that does not have Full HD and HDMI port.


オートフォーカスマイクロスコープ

Auto-Focus Microscope

Auto-Focus Microscope

Advantages
– No need for manual focusing, thanks to ultra-fast auto-focus.
– Achieves smooth movement and high resolution.


Disadvantages
– Limited options for image storage due to direct monitor connection.
– Recording media is restricted to the built-in MicroSD card.


ビデオマイクロスコープ

Video Microscope

Video Microscope

Advantages

– If it’s just a video connection, it can be used anywhere. It features smooth movement.

A wide variety of external crises are commercially available.

Disadvantages

– Due to the number of scanning lines of TV monitor, the resolution is quite low.


Summary

For ease of use on inspection lines, microscopes with no display delays, such as High-Definition Microscopes, Auto-Focus Microscopes, and Video Microscopes, are suitable choices.


If you desire high-resolution observation in full high definition, High-Definition Microscopes and Auto-Focus Microscopes are ideal options. Alternatively, if resolution is not a primary concern, a Video Microscope would be the most suitable choice.

CAN I MEASURE THE LENGTH WITHOUT CALIBRATION?

There are several methods. One of these methods is to draw a cross line on the monitor and measure it by using digital micrometer XY table.


Another methos is to measure the length by using software. In that case, the lens, camera, PC monitor and resolution are all set on the same environment

Therefore, if you calibrate at each magnification and save the calibration data first. Then, you can view the data without calibrating.


Since our standard variable magnification lens (SDS – M) has the stop key, it is reproducible for anyone using it. It is possible to measure if you already read the calibrated file with that scale before.

Furthermore, with a high-definition non-calibration microscope, calibration values are pre-registered from the outset, and since the camera and lens are always synchronized, there is no need for calibration. This allows for instant measurement even when changing the magnification.


クリック付ズームレンズ

Standard variable magnification lens

SDS-M

500万画素USB3.0マイクロスコープ

 5MP USB3.0 microscope

equipped with a zoom lens with a click function

TG500CS

寸法測定(自動校正)マイクロスコープ

The camera and lens are synchronized!

  • Measurement without calibration
  • Instantaneous magnification identification Dimension measurement (automatic calibration) microscope    CT200HD


Please contact our Technical Advisor for more details.

MICROSCOPE WITH TELECENTRIC LENS

The telecentric lens is very suitable for measuring the product size at high magnification with no expansion of the object within the depth of focus, less distortion of the surroundings.


Since it is a fixed magnification, there is no versatility like a zoom lens.

(There are many types of lens with a fixed magnification)

In addition, Since the magnification does not change, we only need to calibrate 1 time in order to measure.

HOW TO OBSERVE THE SIDE VIEW OF THE OBJECT WITH MICROSCOPE?

There are cases where you want to change the microscope to side view by observing the inside of a slightly thicker tube or solder observation of BGA etc. (I want to observe the side).

In that case we will introduce useful things.

Its product called reflective mirror box.

反射ミラーボックス  

There are 2 following suitable lens.

The upper part is a magnigying lens, about 25x to 135x (The variable magnification lens will be changed with aperture SDS – M19), the bottom is a variable magnification lens, about 30x to 60x.

2種のレンズに取り付け可能

The reflection mirror box is attached to the lens head.

Mounting brackets are required separately when installing. Please do not hesitate to contact us if you need any furthure information.

反射ミラーボックスはレンズの先端に取付け 反射ミラーボックスはレンズの先端に取付け

However, a connection ring is necessary to attach. (Please contact us for more details)

リング照明が装着不可

It is impossible to attach LED Ring Light when using the reflection morror box

Besides that, the ordinary LED Ring Light can not be installed.

Thus, it is necessary to devise measures such as using fiber lighting, thin lighting, etc.


<Slim light>    
薄型照明 薄型照明 薄型照明
     
<Optical fiber light>
Optical fiber light can be matted inside.
ファイバー照明 ファイバー照明